I Built a Terrible Roomba
I spent the last few months making a roomba. I mean, sorta. I made a robot that wanders around and ostensibly vacuums as it goes. But it gets stuck on things all the time, and the floor isn’t particularly clean by the time it runs out of batteries. Nevertheless, it was an experience1 and I learned a lot, so I though it would be a good idea to document. Consider the following a devlog, one that might be interesting for the historical record — but which I don’t suggest following to build your own roomba.
This all started when I googled for “fun robot projects,” and came across this terrible video. It goes through building a little roomba life-hack-style, which is to say, in absolutely no detail but vaguely making the whole procedure look simple. They use some cardboard and a cup-noodle container, so I thought “how hard could this be?” What I didn’t notice at the time was how the thing they build is not the thing they demo, nor how there are crucial components that are completely disconnected. As it happens, this video is completely smoke and mirrors.
I’d picked up some motors and a motor controller for a previous, ill-fated project. And I had an old sonar module lying around in order to do the range finding. So I figured all that was left was a cup-noodles container and a fan, and I’d be on my merry way.
Stupidly, I decided I wasn’t going to make this thing out of cardboard. I was going to design and 3D print the chassis and all of the fiddly little bits it would require. My 3D printer’s bed is 22cm square, which meant anything I wanted to make was going to need to be smaller than that. My first prototype was shaped like a flying disc, with a hole in the middle to put the noodles container, but I learned the hard way that there simply wasn’t enough floor-space on the disc to fit all of the necessary electronics. Back to the drawing board.
I farted around with the base plate design for like a month, trying things. In the meantime, I picked up some CPU fans, assuming that all fans are made equally. This is not true — CPU fans are good at moving air, but not good at, uh… pressurizing air? or something? The idea is that a CPU fan won’t force air somewhere it doesn’t want to go, for example, into a vacuum bag. For that you want a blower fan, but I spent $50 buying the wrong sorts of fans on amazon before I figured this out.
Fans are measured in CFM, which is some sort of non-standardized measurement of “cubic feet per minute.” How much more imperial can you get? Non-standardized here means that all fan manufactures have a different procedure for measuring the CFM, so you can’t just compare numbers. That would be too easy.
It took many weeks of not having my roomba suck enough before I realized that fans move a constant volume of air, not a constant mass. The difference is that, unless you have really good intake to your fan, it’ll just make your vacuum chamber really low pressure, and not actually translate into sucking hard at the nozzle. I sorta worked around this by just mounting the fan directly above the vacuum bag, which had a small cut-out to pull debris through. Pipes seem to be anathema to small fans that you’re trying to use as vacuum pumps.
I tried using some agitators to improve my suction by getting things moving. My first attempt was via a gear train that I didn’t realize was 10RPM — way too damn slow to get anything moving. I didn’t feel like waiting around for another amazon shipment, so I just tried running my 12V 2000RPM DC motors at 3V. It sorta worked, but the handmade brushes I built dissolved themselves by still spinning too fast. Since it didn’t seem to improve the suction by much, I ended up scrapping this idea.
While trying to prototype something together with alligator clamps, I accidentally shorted my battery and caused no-small amount of smoke and did some unintentional welding. Thankfully it didn’t explode! I was doing stupid, unsafe things with the battery, but I learned the wrong lesson from this — that I should properly solder all of my connections, even when prototyping. What I should have learned instead was to make a really safe breakout connector for my battery, and then play fast and loose with crimps and connectors from there. But I didn’t yet know about crimps and connectors, so I just hand-soldered everything. It took forever and my productivity went asymptotically towards zero. Especially because I didn’t yet know what I was making, so there was a lot of soldering and desoldering and resoldering.
To make things worse, I kept 3D printing half-figured out chassis — each one of which took like nine hours to print. Inevitably some part wouldn’t fit, or the suction would be off, or some other problem would arise. Cardboard next time, my dude.
Oh, and did I mention that I don’t know how to connect physical things, so I just ended up hot-glueing everything together? Like, everything.
One day I was hanging out on IRC, describing my project when Julia Longtin said “oh my god STOP. You’re going to burn down your house!” She had correctly noticed that I hadn’t put a battery management system in front of my battery. If you’re a hobbyist like I am, you might not know that LiPo batteries have a bad habit of catching on fire when you charge them after letting their voltage drop too low. A BMS board watches the voltage on the battery and cuts the circuit before it gets dangerously low. When testing this thing (after the BMS was installed,) it turned off quite often, so I’m pretty sure Julia saved me a ton in fire insurance claims. Thanks Julia!
The roomba’s only sensor is a sonar module that shoots sound waves and listens to hear when they come back. It’s essentially echo-location, like what bats have. Unfortunately for me, we also have the expression “blind as a bat,” which pretty adequately describes the robot. Sonar is a neat idea in theory, but in practice it only reliably works up to about a foot in front, and cloth-covered things like sofas muffle it. When added to the fact that DC motors offer no feedback if they’re stalled, it meant my roomba couldn’t detect if it were moving down a long hallway or stuck trying to drive into the couch. These are two scenarios you really want different behaviors for.
But even worse, due to my design and the limitations of my 3D printer bed, I couldn’t figure out how to fit the wheels inside the robot and still get all of the electronics and vacuum supplies on-board. As a compromise, the rubber tires jut out about two centimeters. Which is just about ideal for getting caught on chair legs and errant cables and walls and stuff like that. So if he hit the wall at a 45 degree angle, he’d just get wedged there. And at 45 degrees, sonar just bounces off of walls and doesn’t return, so again, you don’t know you’re stuck.
What a piece of work.
The software on this thing is a big state machine with things like “drive forward” and “bounce off of driving straight into the wall” and “try relocate because you’ve been stuck in the couch for too long.” I expected the software to be the easiest part of this project, since I’m an ex-professional software engineer. But not so! Even after you discount the time I accidentally melted my Arduino — by… well, I’m not sure what, but definitely related to plugging it into the computer — the software didn’t go smoothly. Arduino has this annoying forced event loop where it calls loop() just as fast as it can, and you can push back with a delay(long milliseconds) function call. But it’s all in C++ (but without the STL) and so getting any real work done is annoying. And have you ever tried to write a proper state machine without algebraic data types? I walked away with the impression that I’m going to need to do a lot of work improving the software end of things before I do another serious project with Arduino.
In short, I spent a few months accidentally setting stuff on fire, waiting too long for the wrong 3D shapes to print, and I all I got was this stupid T-shirt. But I guess that’s what learning feels like. But I’ve already bought a LIDAR module and some bumpers for mk 2, so maybe I’m just a glutton for punishment.
If you’re curious about actually building this thing, here’s all of the source materials. But please, do yourself a favor and don’t put yourself through the mental turmoil of trying to get it to work.
Building One For Yourself
Don’t. But if you do, you’ll need these parts:
Bill of Materials
- Motor wheels
- L298N
- HC-SR04
- 4S BMS Board
- 12V, 1A, 36.2CFM Blower fan
- Arduino Nano
- 2x LM2596 DC to DC buck converter
- Ball bearing
- 14.8V RC LiPo battery
- Diode
- Flip switch
- 5.5mm DC jack female
- 15V DC power supply
3D Printed Parts
The whole thing is written in a Haskell DSL for 3D printing called ImplicitCAD, because of course it is. Have you met me? The source code is available here, where everything definition prefixed with final_ needs to be printed.
Oh yeah, and even after being very careful to model the negative space necessary for the fan’s exhaust, I forgot to connect that to the body of the roomba, so I needed to cut the exhaust hole out with my soldering iron. The resulting smoke was pretty noxious, so I just tried to not breathe too hard.
Source Code
Here’s the code I wrote for this thing. It’s not beautiful, and shouldn’t be considered as evidence as to how I write real code that I care abut. Sorry not sorry.
Schematic
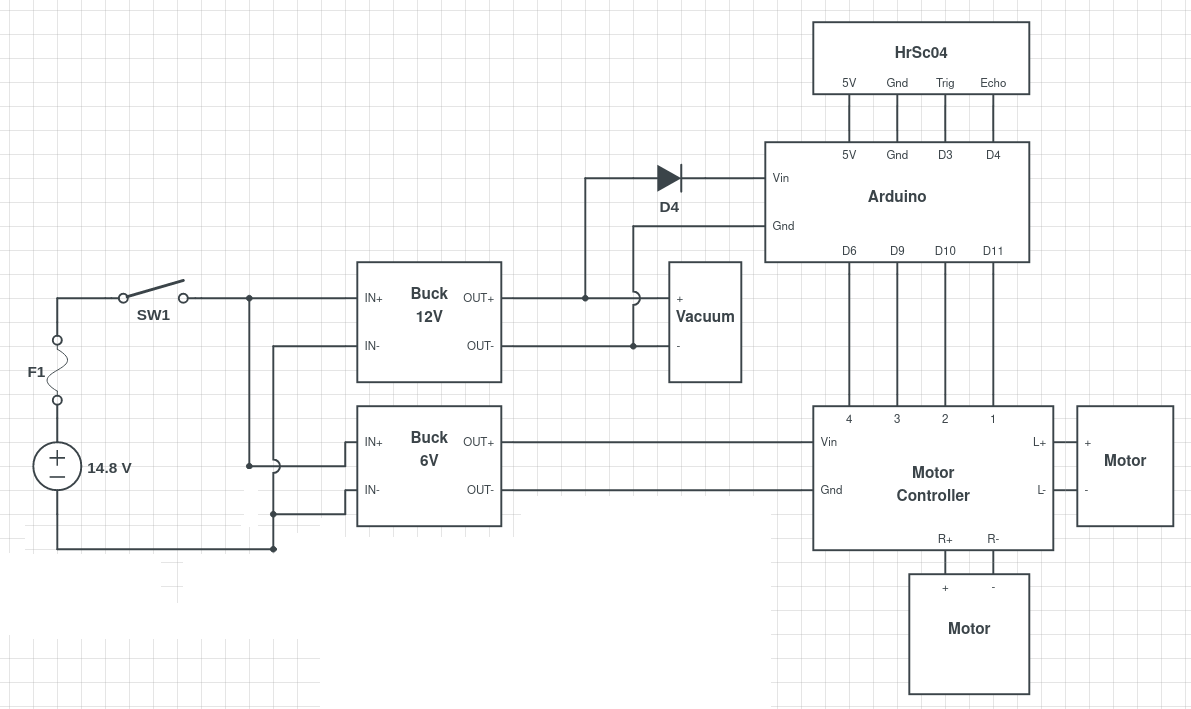
What’s labeled as the voltage source here should instead be the BMS. And no promises that the pins on the Arduino correspond exactly with what the source code actually does. I think it’s right, but the roomba might drive backwards.
I’m hesitant to call it a good experience.↩︎